The extensions refer to the internal phones attached to the IP PBX.
Extensions have a double role:
a) The extension's number is the username used by your telephone(hardphone or soft client) to authenticate itself to FreeSentral.
b) The extensions number can be used to login in the interface to listen to voicemail messages and set forward options for each extension.
Call between extensions are made trough the FreeSentral server, free of charge.
After defining the extensions, one is able to create Groups and add extensions to each group, an extension being able to exist in more than one group. Each group will have it's own extension number of two digits. When a call will come for the group all the extensions in that group will be called. The first one that answers will take the call.
Add extension:
- Go to the menu Extensions.
- Select Add extension from the submenu.
- Fill in the box with the required information.
- Press Save to finish the operation.
- Press Reset to delete the information and write a new one.
Search extension:
- Go to the menu Extensions.
- Select Search from the submenu.
- Select the parameters for your search.
- Press Submit to start the search.
- Press Reset to select different parameters.
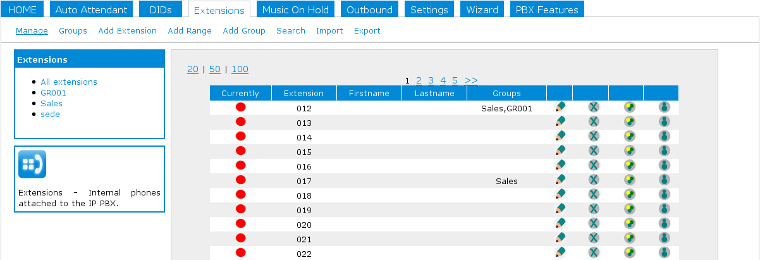
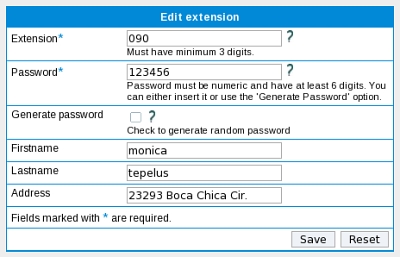
Edit extension:
- Go to the menu Extensions.
- Select Manage from the submenu. Here you have a list with all the extensions added so far.
- Press the edit button associated with the extension you want to edit.
- Fill in the box with the required information.
- Press Save to complete the operation.
- Press Reset to delete the information and write a new one.
Delete extension:
- Go to the menu Extensions.
- Select Manage from the submenu. Here you have a list with all the extensions added so far.
- Press the button delete associated with the extension you want to delete.
Join group:
- Go to the menu Extensions.
- Select Manage from the submenu. Here you have a list with all the extensions added so far.
- Press the join group button associated with the extension you want to add to a group.
- Select the group.
- Press Save to complete the operation.
- Press Reset if you want to select another group.
Impersonate extension:
As an admin you can enter into an extension's account by using this option.
- Go to the menu Extensions.
- Select Manage from the submenu. Here you have a list with all the extensions added so far.
- Press the impersonate button associated with the extension you want to impersonate.
Import
If you have a large number of extensions you want to add it would be easier to import a list than add it manually.
- Go to the menu Extensions.
- Select Import from the submenu.
- Press Browse to select your file.
- If you need help with creating the file, you can download here a sample .xls file. Complete it with your information. Press Browse to select it.
- Press Upload to complete the operation.
- Press Reset if you want to select another file.
Add range:
If you want to add extensions with consecutive numbers, such as from 100 to 110, you can use this option.
- Go to the menu Extensions.
- Select Add range from the submenu.
- Fill in the box with the required information.
- Press Save to finish the operation.
- Press Reset to delete the information and write a new one.
Editing a group
Add group:
Put your system in order by creating groups of extensions.
- Go to the menu Extensions.
- Select Add group from the submenu.
- Fill in the box with the required information. When defining a group one needs to set it's name(group field), it's extension(number that has to be called in order to reach the group) and the playlist used for music on hold.
- Press Save to finish the operation.
- Press Reset to delete the information and write a new one.
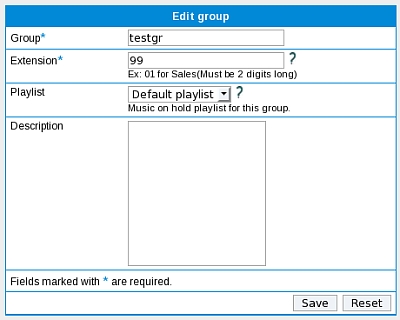
Edit group:
- Go to the menu Extensions.
- Select Groups from the submenu. Here you have a list of all the groups you've added so far.
- Press the edit button associated with the group you want to edit.
- Fill in the box with the required information. When defining a group one needs to set it's name(group field), it's extension(number that has to be called in order to reach the group) and the playlist used for music on hold.
- Press Save to finish the operation.
- Press Reset to delete the information and write a new one.
Delete groups:
- Go to the menu Extensions.
- Select Groups from the submenu. Here you have a list of all the groups you've added so far.
- Press the delete button associated with the group you want to delete.
Remove group members:
- Go to the menu Extensions.
- Select Groups from the submenu. Here you have a list of all the groups you've added so far.
- Press the members button associated to see the members of a certain group.
- Press the delete button associated with the member you want to remove from the group.
Configuring

 Edit
Edit